Adding Network Devices for Monitoring
ObserveOps (formerly known as AIOps) monitors network devices by discovering them over SNMP and provisioning them as monitors. Before ObserveOps can collect metrics from a device, you need a Credential Profile with the correct community string or SNMPv3 credentials, and a Discovery Profile that tells ObserveOps which addresses to scan.
Network Protocols Supported
ObserveOps supports the following SNMP protocols for network device monitoring:
- SNMP v1/v2c
- SNMP v3
Prerequisites for Network Monitoring
- Ensure that SNMP is properly configured on the target device.
- Verify that the device supports SNMP v1/v2c or SNMP v3.
- Confirm that port
161is open and accessible from the ObserveOps server. - Ensure the community string (v1/v2c) or security credentials (v3) are configured on the device.
Prerequisites for SNMP-Based Server Monitoring (Windows and Linux)
To enable SNMP-based discovery and monitoring of Windows and Linux servers, follow the steps below. This applies to SNMP v2c, the most commonly supported protocol across operating systems.
Windows Server (Windows 10 v1809+, Windows 11)
A. Install SNMP Feature
Use PowerShell to install SNMP:
Add-WindowsCapability -Online -Name "SNMP.Client~~~~0.0.1.0"
B. Enable SNMP Service
- Open
services.msc. - Locate SNMP Service, right-click and open Properties.
- Set Startup type to Automatic.
C. Configure SNMP v2c Access
- In the Agent tab (optional): enter Contact and Location details. Select applicable service types (Physical, Applications, Internet).
- In the Security tab:
- Under Accepted community names, select Add and enter a strong community string (for example,
MyReadOnlyString). Set access to READ ONLY. - Under Accept SNMP packets from these hosts, select Add and enter the ObserveOps server IP.
- (Optional) Enable Send authentication trap for unauthorized access alerts.
- Under Accepted community names, select Add and enter a strong community string (for example,
Windows only supports SNMP v1/v2c. SNMP v3 is not supported on Windows.
Linux Server (Ubuntu)
A. Install SNMP Packages
sudo apt update
sudo apt install -y snmpd snmp libsnmp-dev
B. Configure SNMP v2c
- Back up the default SNMP configuration:
sudo cp /etc/snmp/snmpd.conf /etc/snmp/snmpd.conf.bak
- Edit the SNMP configuration:
sudo nano /etc/snmp/snmpd.conf
- Set the agent to listen on all interfaces:
agentAddress udp:161
- Set a read-only community for a specific host:
rocommunity MyReadOnlyString 192.168.1.1
Replace MyReadOnlyString with a strong community string (20+ characters recommended). Replace the IP with your ObserveOps server address.
Save and exit the configuration file. Restart and enable the SNMP daemon:
sudo systemctl restart snmpd
sudo systemctl enable snmpd
- SNMP v1/v2c
- SNMP v3
- UPS Devices
Adding a Device Using SNMP v1/v2c
1. Create a Credential Profile
Go to Menu. Select Settings  . Select Discovery Settings
  . Select Credential Profile. The Credential Profile screen opens. Select Create Credential Profile.
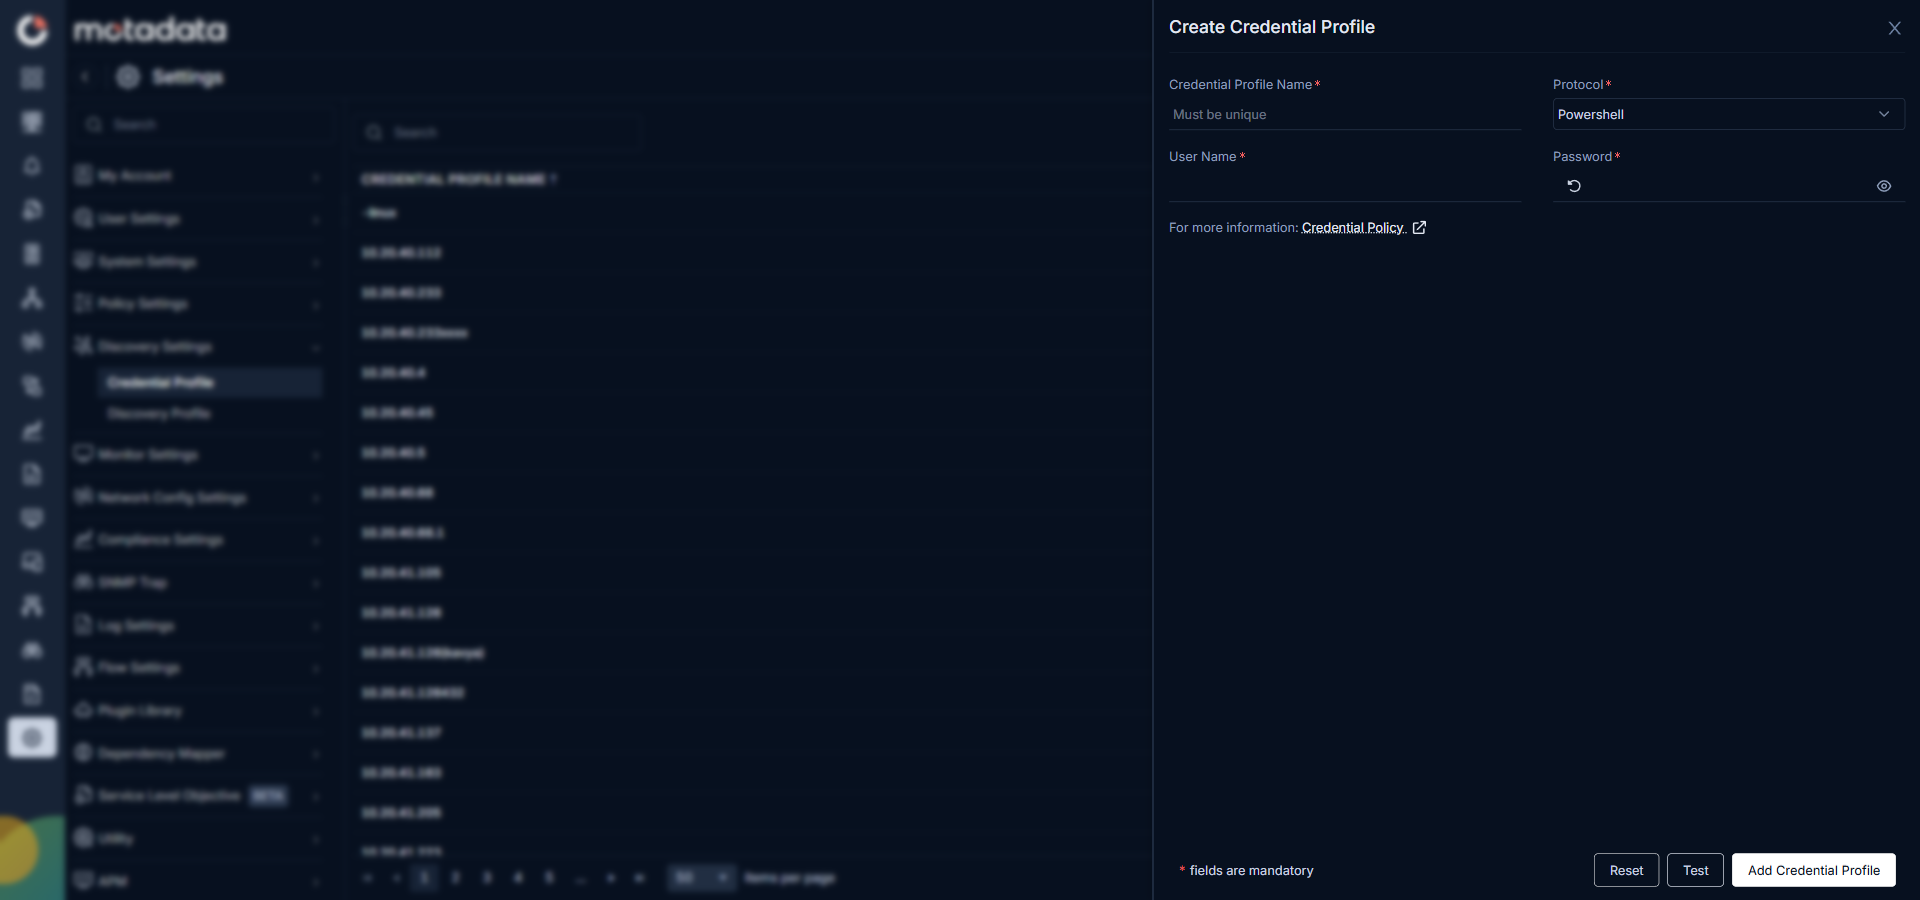
The Create Credential Profile form opens.
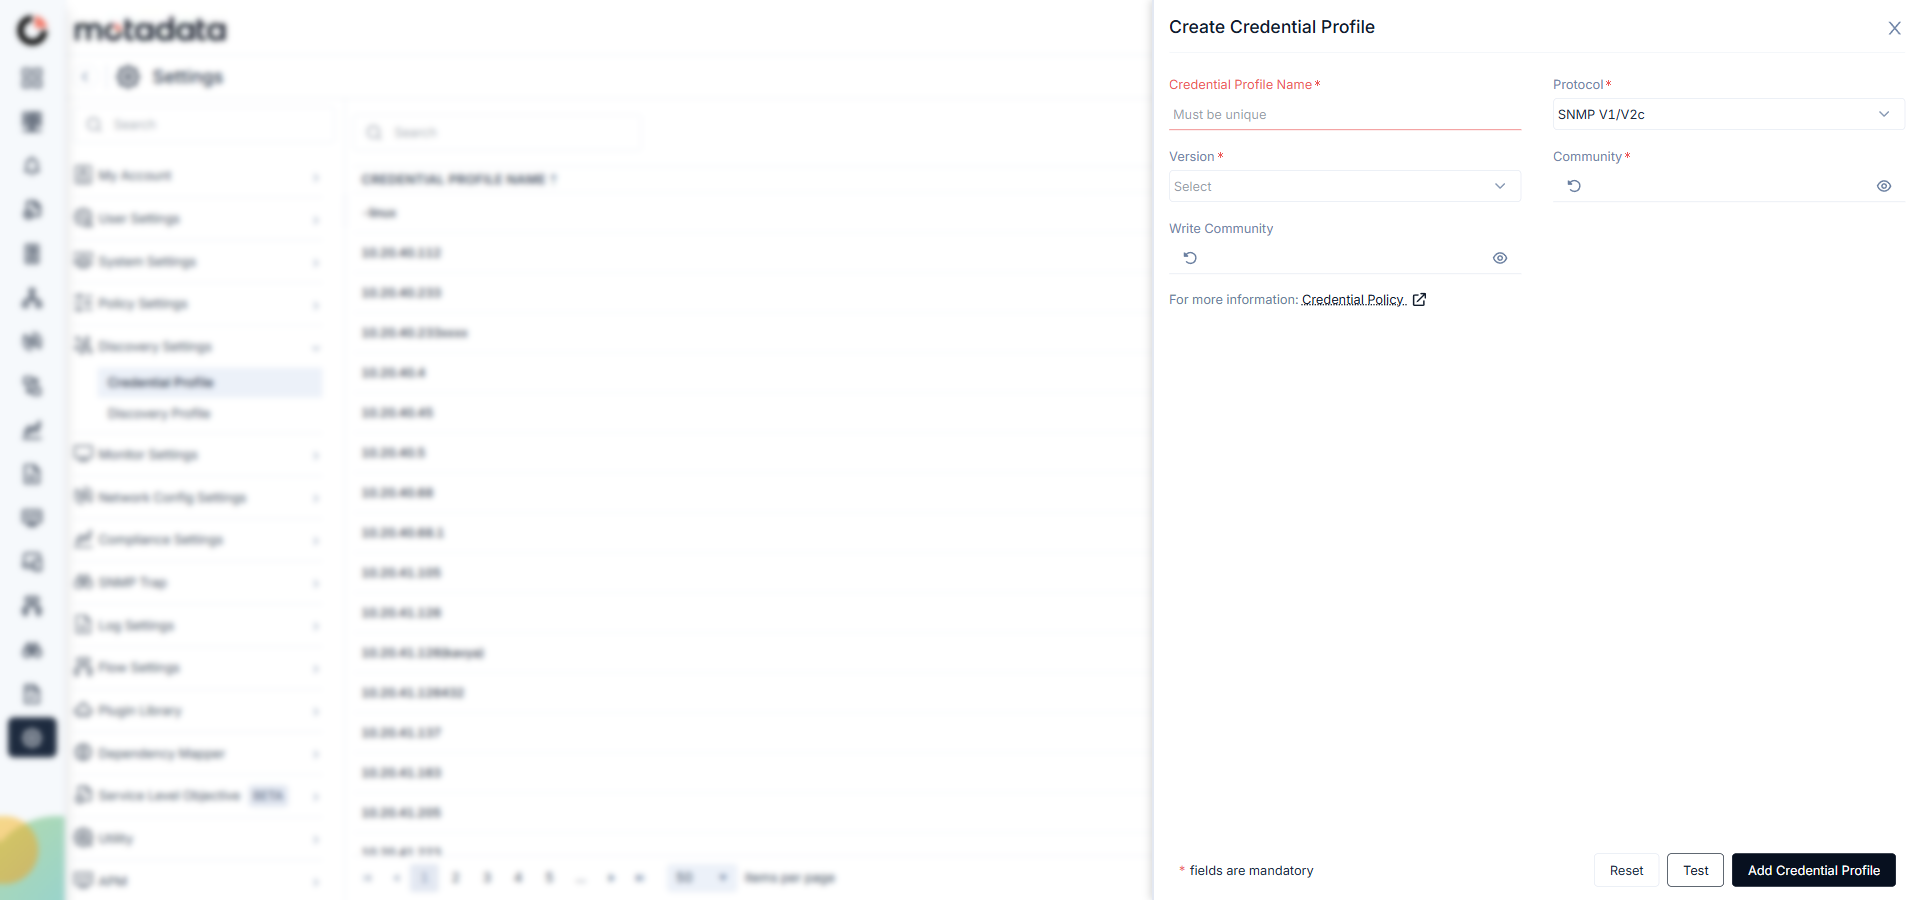
| Field | What to Enter |
|---|---|
| Credential Profile Name | A unique name to identify this profile |
| Protocol | Select SNMP V1/V2c |
| Version | Select V1 or V2c to match your device configuration |
| Community | The read community string configured on the device |
| Write Community | The write community string, if ObserveOps needs to send write commands |
Select Test to verify the credentials connect to a specific device. Select Reset to clear all fields. Select Add Credential Profile to save.
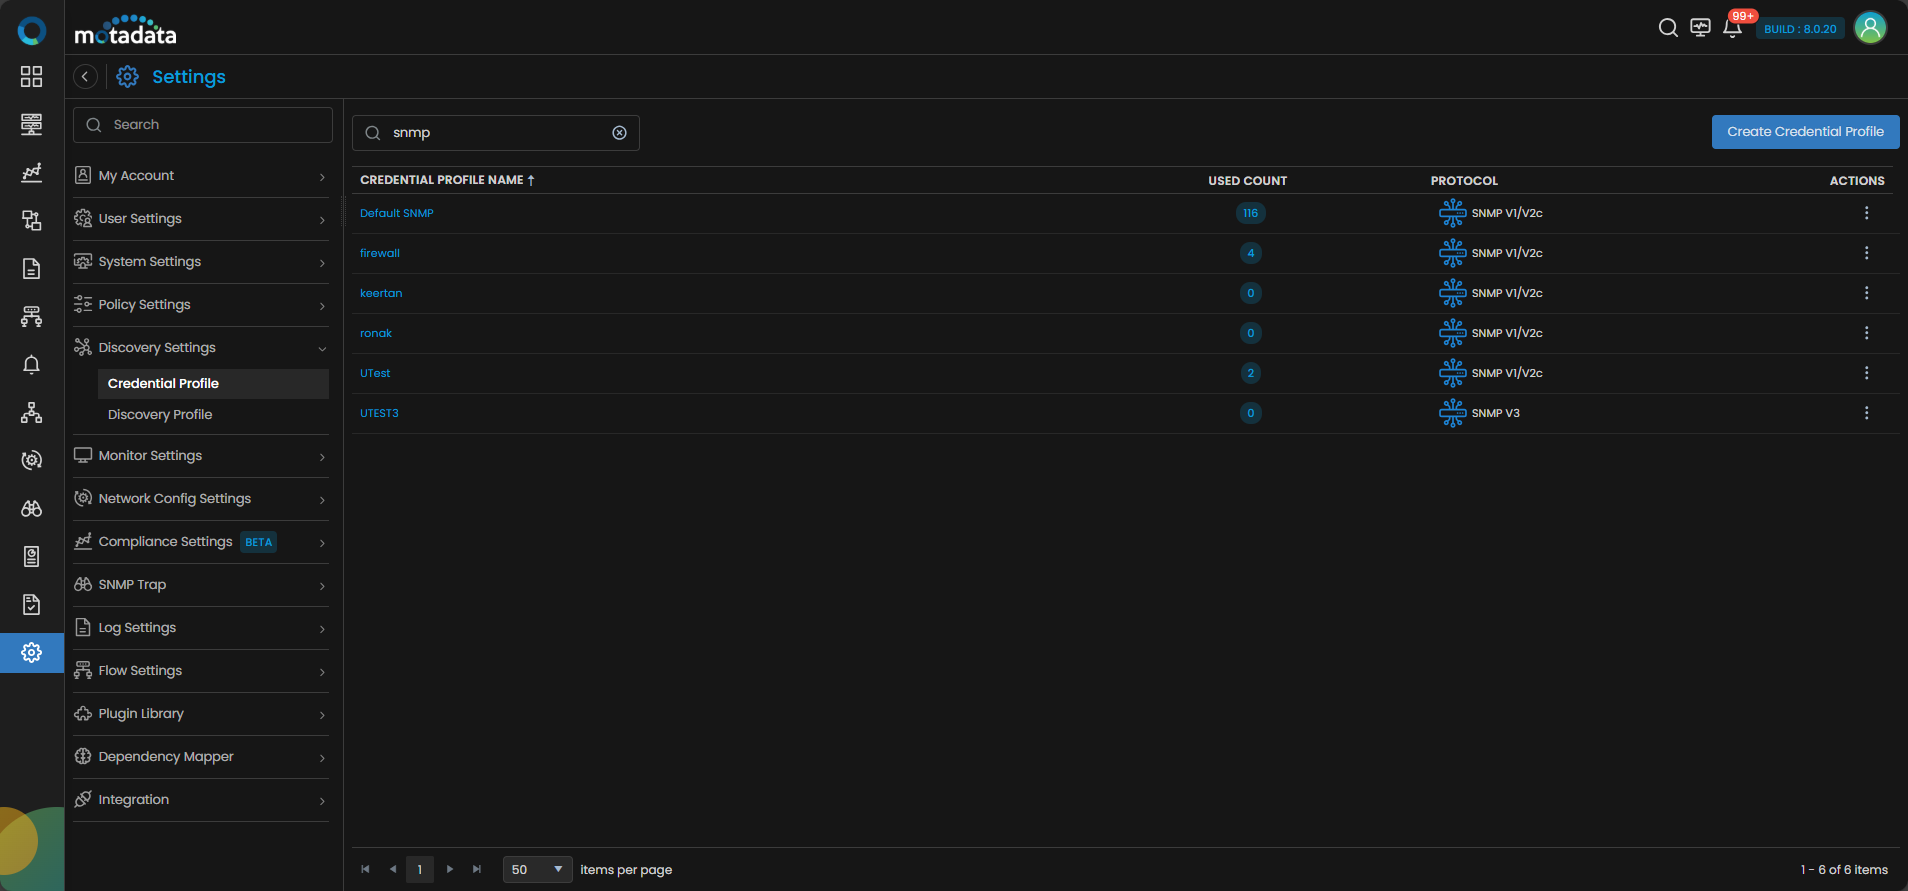
The profile now appears in the Credential Profile list.
NCCM Credential Profile
To enable NCCM discovery for this device, create an SSH credential profile with CLI options:
- Select SSH as the protocol.
- Enter Username, Password, SSH Key, and Passphrase.
- Select the CLI Options checkbox. Additional fields appear.
- Select a Config Transfer Protocol (TFTP, FTP, SCP/SFTP, or No Protocol).
- Enter the Enable User Name for elevated-privilege access.
- Enter the Enable Password for that username.
- Enter the Enable Command that switches the device to enable mode.
- Enter the Enable Prompt that appears when enable mode is active.
- Enter the Config Mode Command that activates configuration mode.
- Enter the Config Password for configuration settings.
- If the device uses VRF, enter the VRF Name.
2. Create a Discovery Profile
Go to Menu. Select Settings . Select Discovery Settings . Select Discovery Profile. The Discovery Profile screen opens. Select Create Discovery Profile.
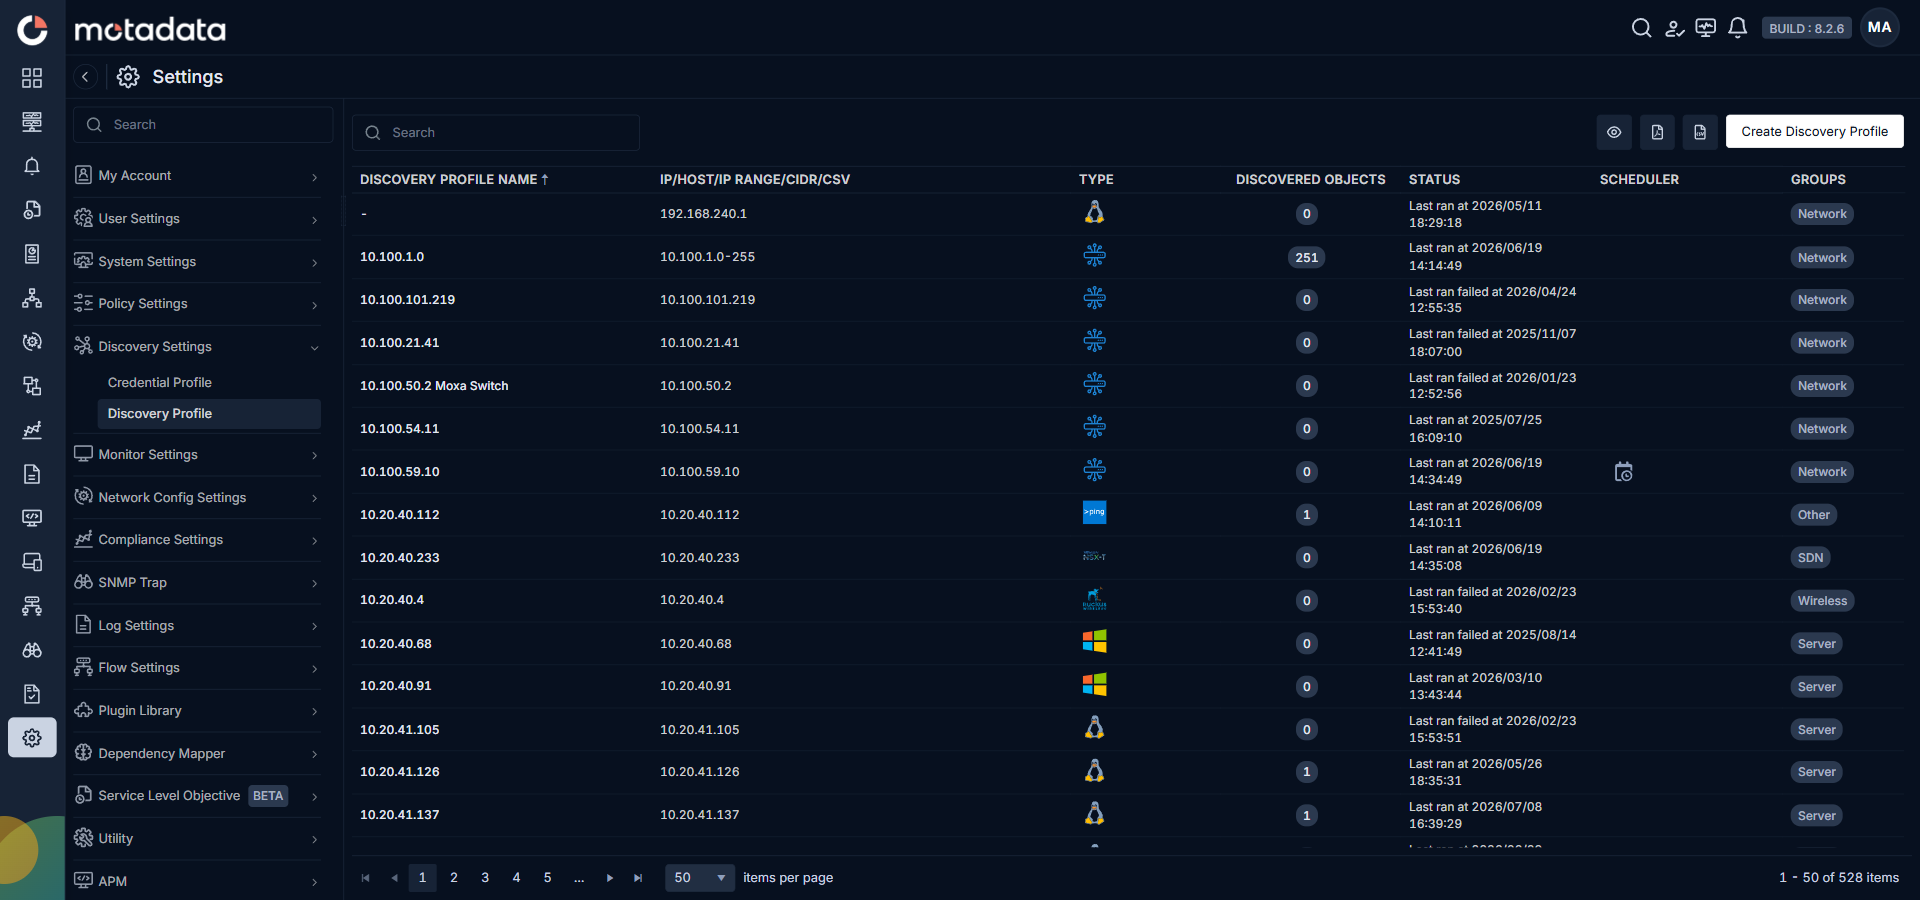
The Create Discovery Profile form opens. Select Network from the sidebar.
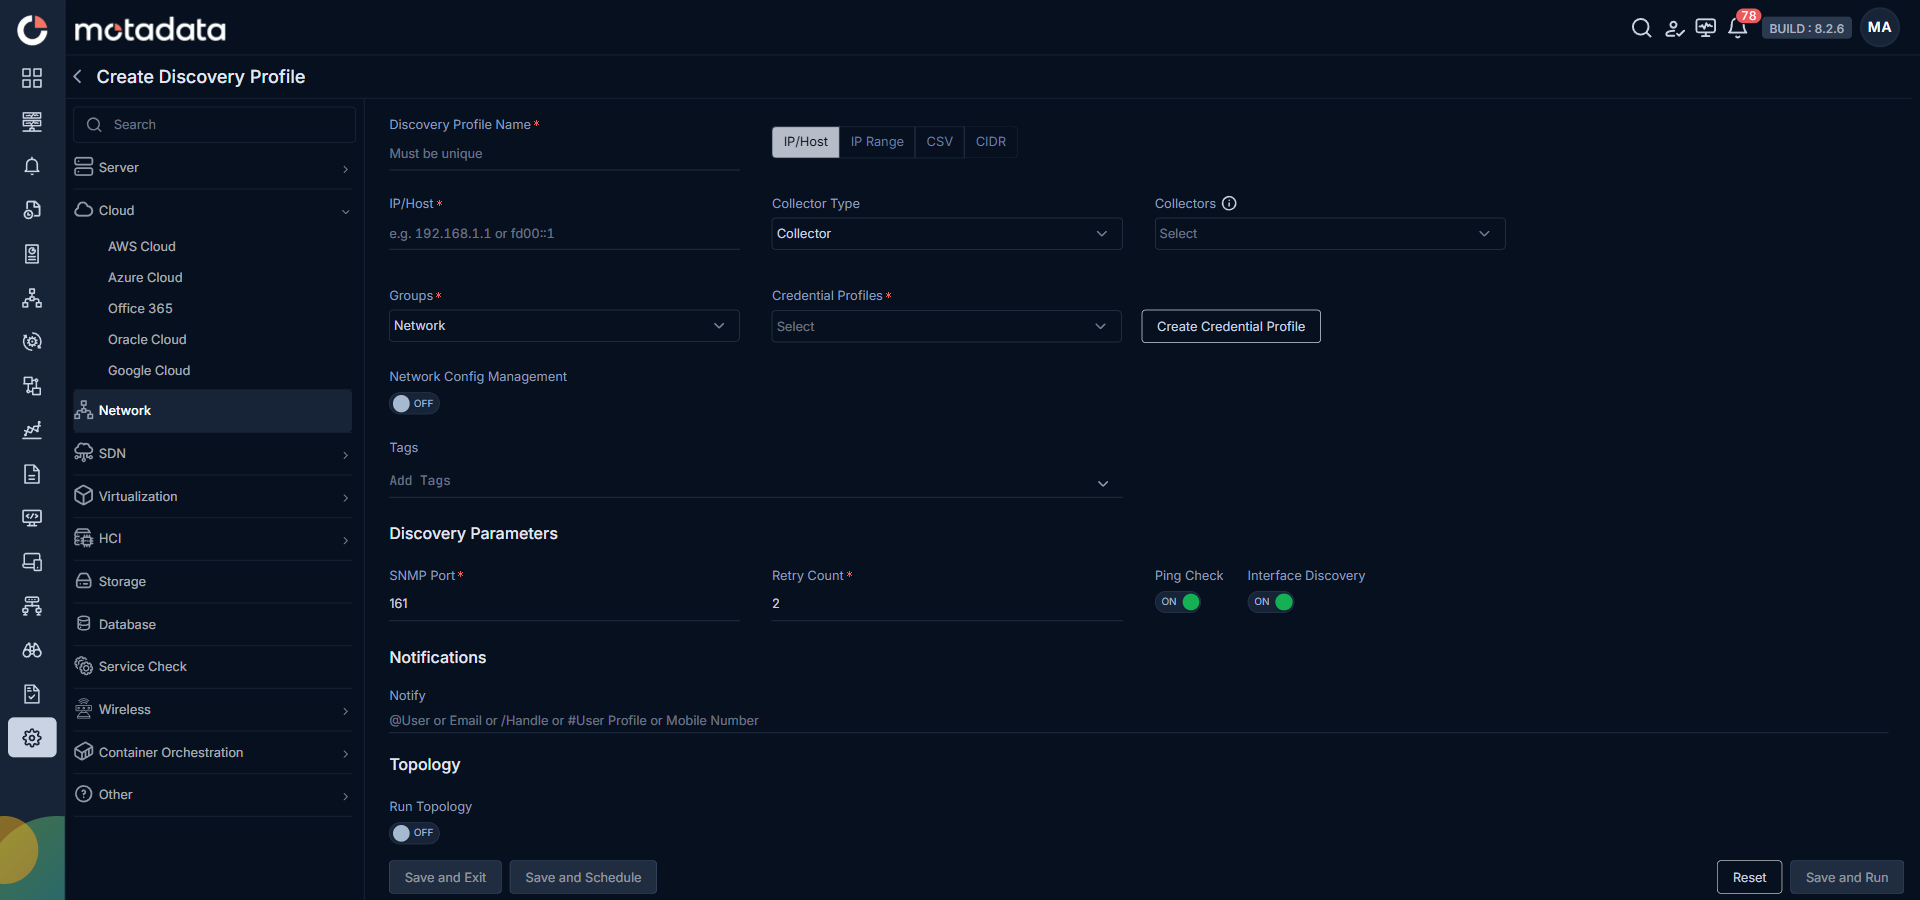
| Field | What to Enter |
|---|---|
| Discovery Profile Name | A unique name to identify this profile |
| IP / Host / IP Range / CIDR / CSV | The address or address range of your network devices |
| Collectors | One or more Collectors for data collection. If you skip this, ObserveOps selects a Collector automatically. |
| Groups | One or more Groups to assign to provisioned monitors |
| Credential Profile | Select the SNMP v1/v2c credential profile you just created |
| Tags | Tags to assign to discovered devices |
| Port | SNMP port. Defaults to 161. |
| Retry Count | Number of retries before ObserveOps considers a device unreachable |
| Ping Check | On by default. Toggle off to discover devices that don't respond to ping. |
| Interface Discovery | On by default. ObserveOps also monitors device interfaces. |
| Notify Team | Email addresses, handles, or mobile numbers to notify when discovery completes |
Select Collectors based on how you want to distribute the monitoring load.
Select Save and Run to save and start discovery immediately. Select Save and Exit to save without running. Select Save and Schedule to schedule discovery for a specific time.
3. Provision the Discovered Devices as Monitors
After the discovery run completes, ObserveOps updates the Discovered Objects count and status.
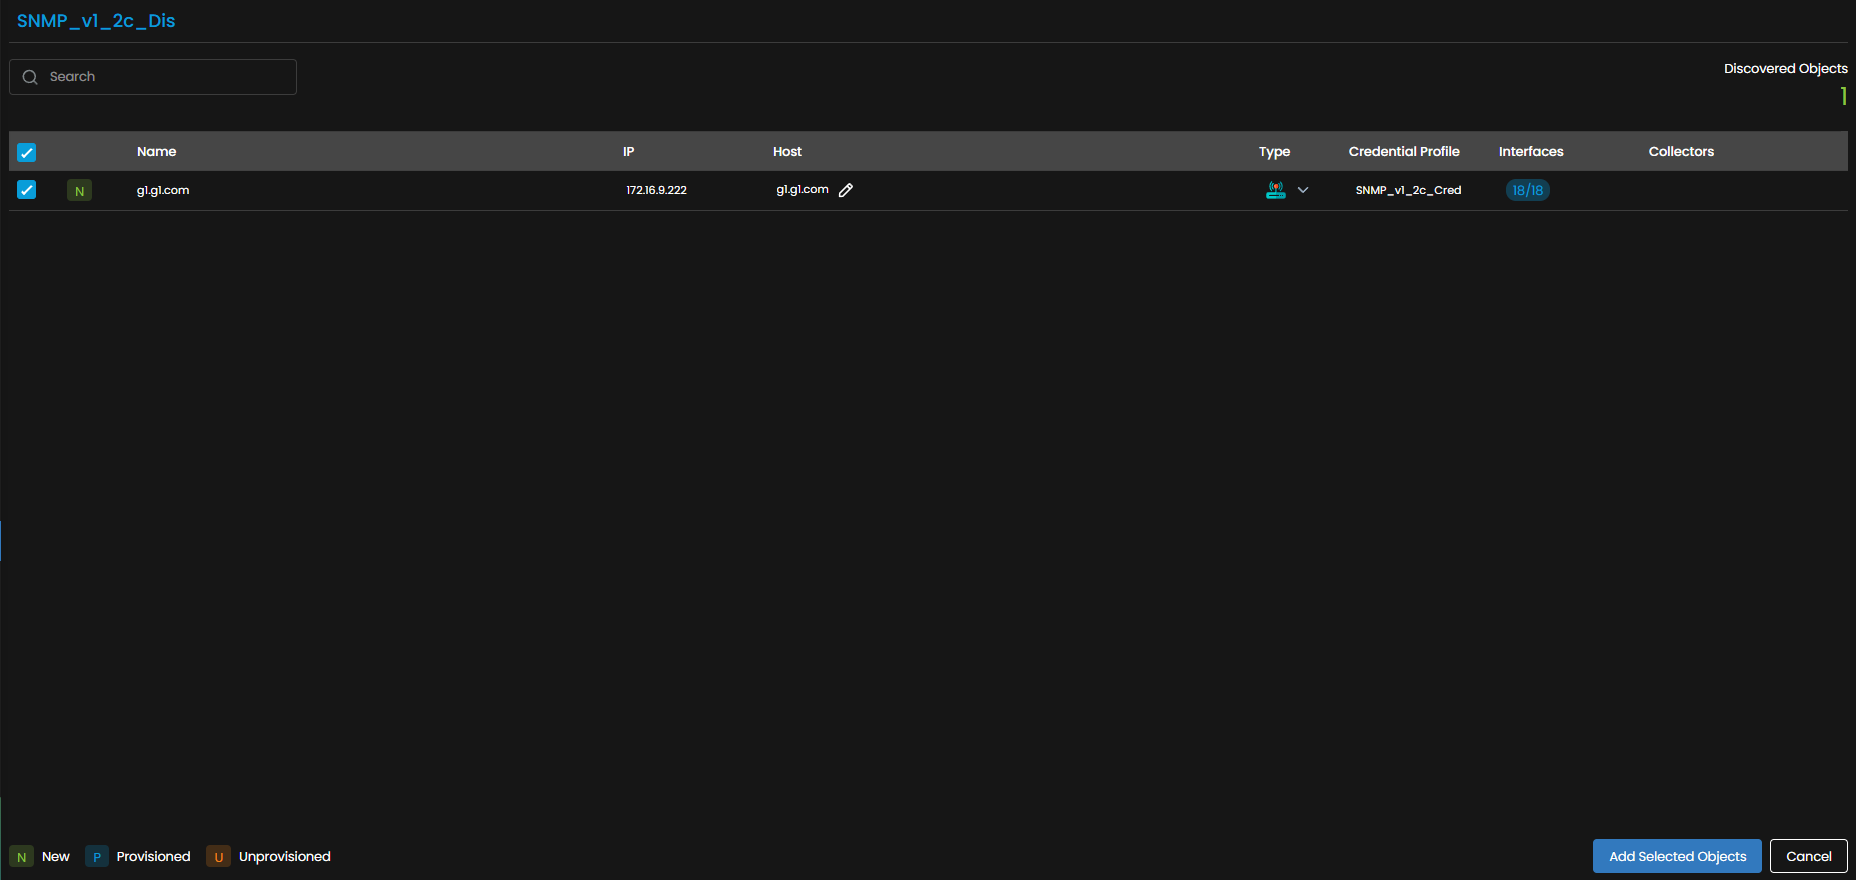
Open the Provisioning screen to see all discovered devices. Select the devices you want to add as Monitors.

Select Add Selected Objects to provision the selected devices as monitors. ObserveOps now collects metrics from these devices continuously.
To view the monitors, go to Menu. Select Monitor. Select Network.
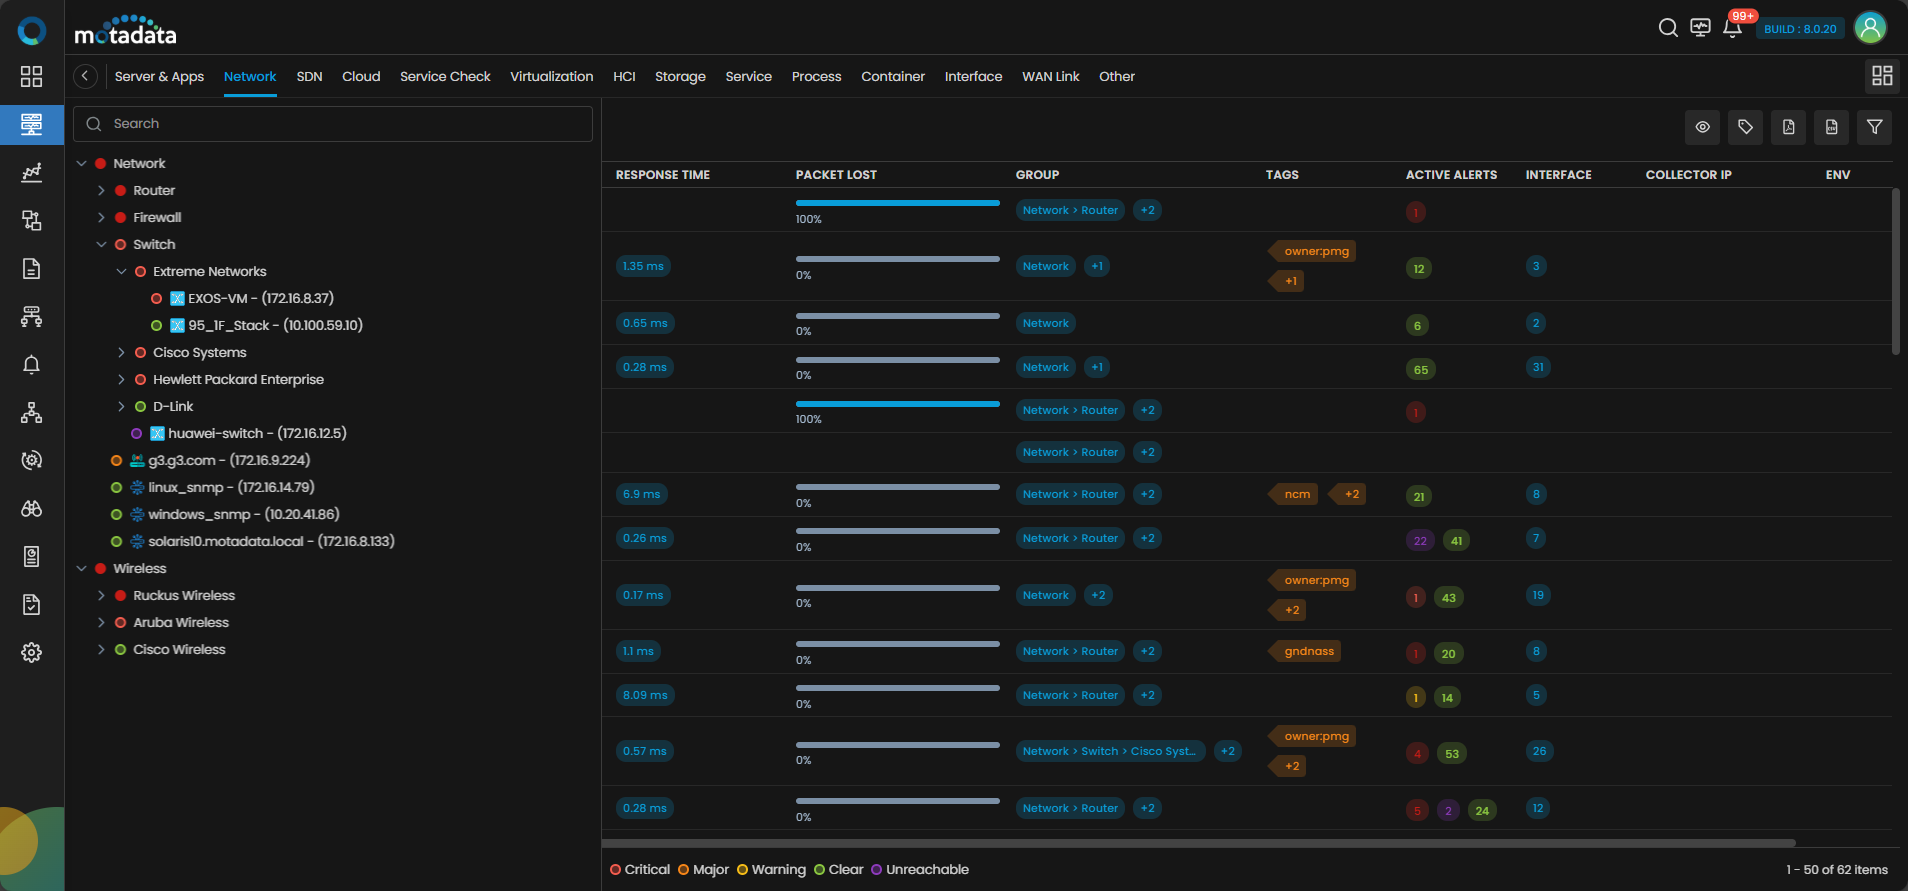
The SNMP v1/v2c network devices are now added to ObserveOps.
Adding a Device Using SNMP v3
1. Create a Credential Profile
Go to Menu. Select Settings . Select Discovery Settings . Select Credential Profile. The Credential Profile screen opens. Select Create Credential Profile.
The Create Credential Profile form opens.
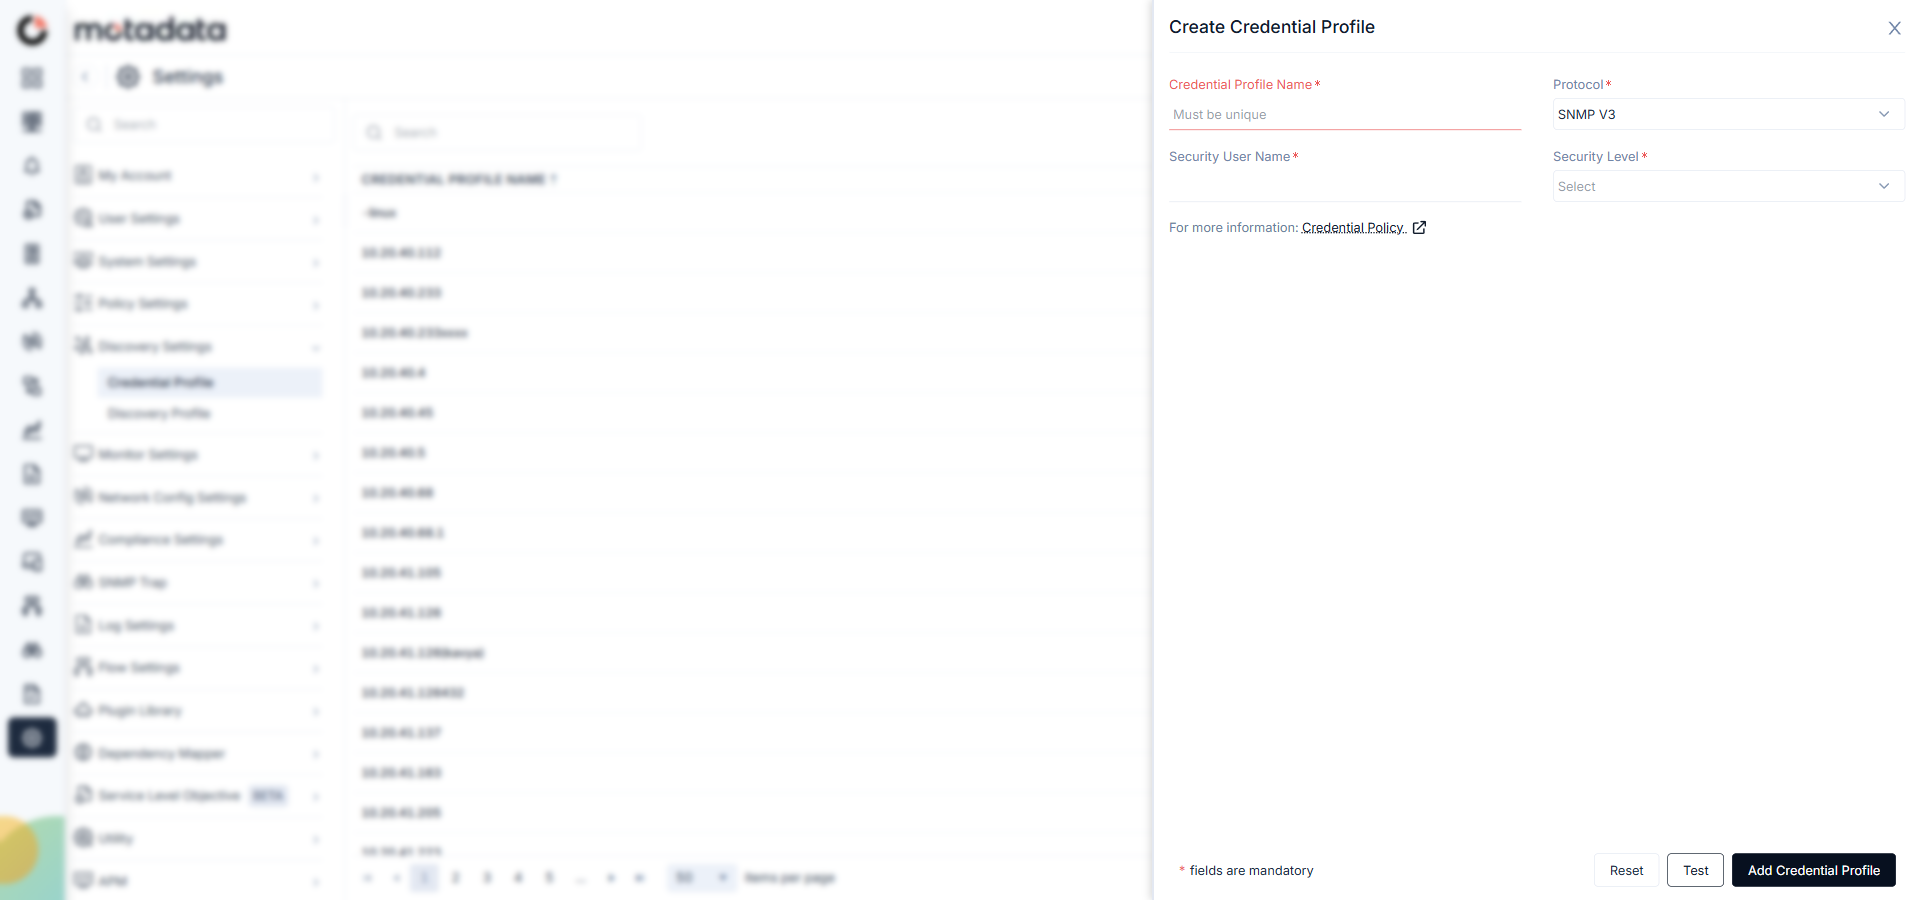
| Field | What to Enter |
|---|---|
| Credential Profile Name | A unique name to identify this profile |
| Protocol | Select SNMP V3 |
| Security User Name | The SNMP v3 username configured on the device |
| Security Level | The authentication and encryption mode. Options: No Auth No Privacy, Auth No Privacy, or Auth Privacy. |
When you select Auth No Privacy, fields for Auth Protocol and Auth Password appear. When you select Auth Privacy, fields for Privacy Protocol and Private Password also appear.
Select Test to verify the credentials connect to a specific device. Select Reset to clear all fields. Select Add Credential Profile to save.
The profile now appears in the Credential Profile list.

NCCM Credential Profile
To enable NCCM discovery for this device, create an SSH credential profile with CLI options:
- Select SSH as the protocol.
- Enter Username, Password, SSH Key, and Passphrase.
- Select the CLI Options checkbox. Additional fields appear.
- Select a Config Transfer Protocol (TFTP, FTP, SCP/SFTP, or No Protocol).
- Enter the Enable User Name for elevated-privilege access.
- Enter the Enable Password for that username.
- Enter the Enable Command that switches the device to enable mode.
- Enter the Enable Prompt that appears when enable mode is active.
- Enter the Config Mode Command that activates configuration mode.
- Enter the Config Password for configuration settings.
- If the device uses VRF, enter the VRF Name.
2. Create a Discovery Profile
Go to Menu. Select Settings . Select Discovery Settings . Select Discovery Profile. The Discovery Profile screen opens. Select Create Discovery Profile.
The Create Discovery Profile form opens. Select Network from the sidebar.
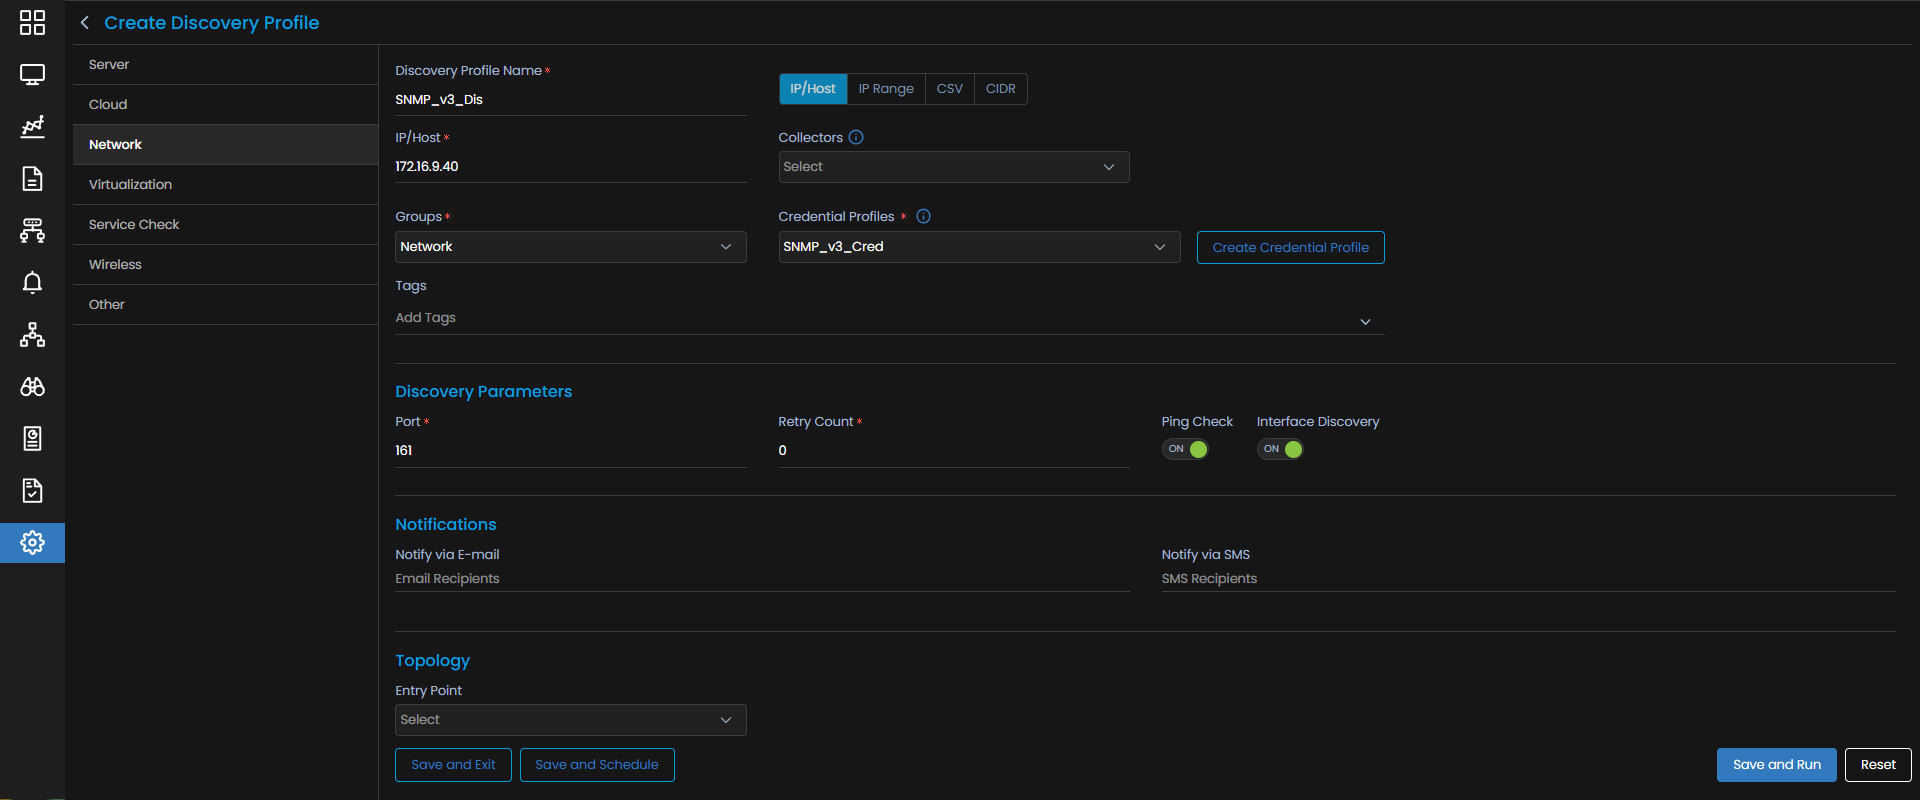
| Field | What to Enter |
|---|---|
| Discovery Profile Name | A unique name to identify this profile |
| IP / Host / IP Range / CIDR / CSV | The address or address range of your network devices |
| Collectors | One or more Collectors for data collection. If you skip this, ObserveOps selects a Collector automatically. |
| Groups | One or more Groups to assign to provisioned monitors |
| Credential Profile | Select the SNMP v3 credential profile you just created |
| Tags | Tags to assign to discovered devices |
| Port | SNMP port. Defaults to 161. |
| Ping Check | On by default. Toggle off to discover devices that don't respond to ping. |
| Notify Team | Email addresses, handles, or mobile numbers to notify when discovery completes |
Select Collectors based on how you want to distribute the monitoring load.
Select Save and Run to save and start discovery immediately. Select Save and Exit to save without running.
3. Provision the Discovered Devices as Monitors
After the discovery run completes, ObserveOps updates the Discovered Objects count and status.
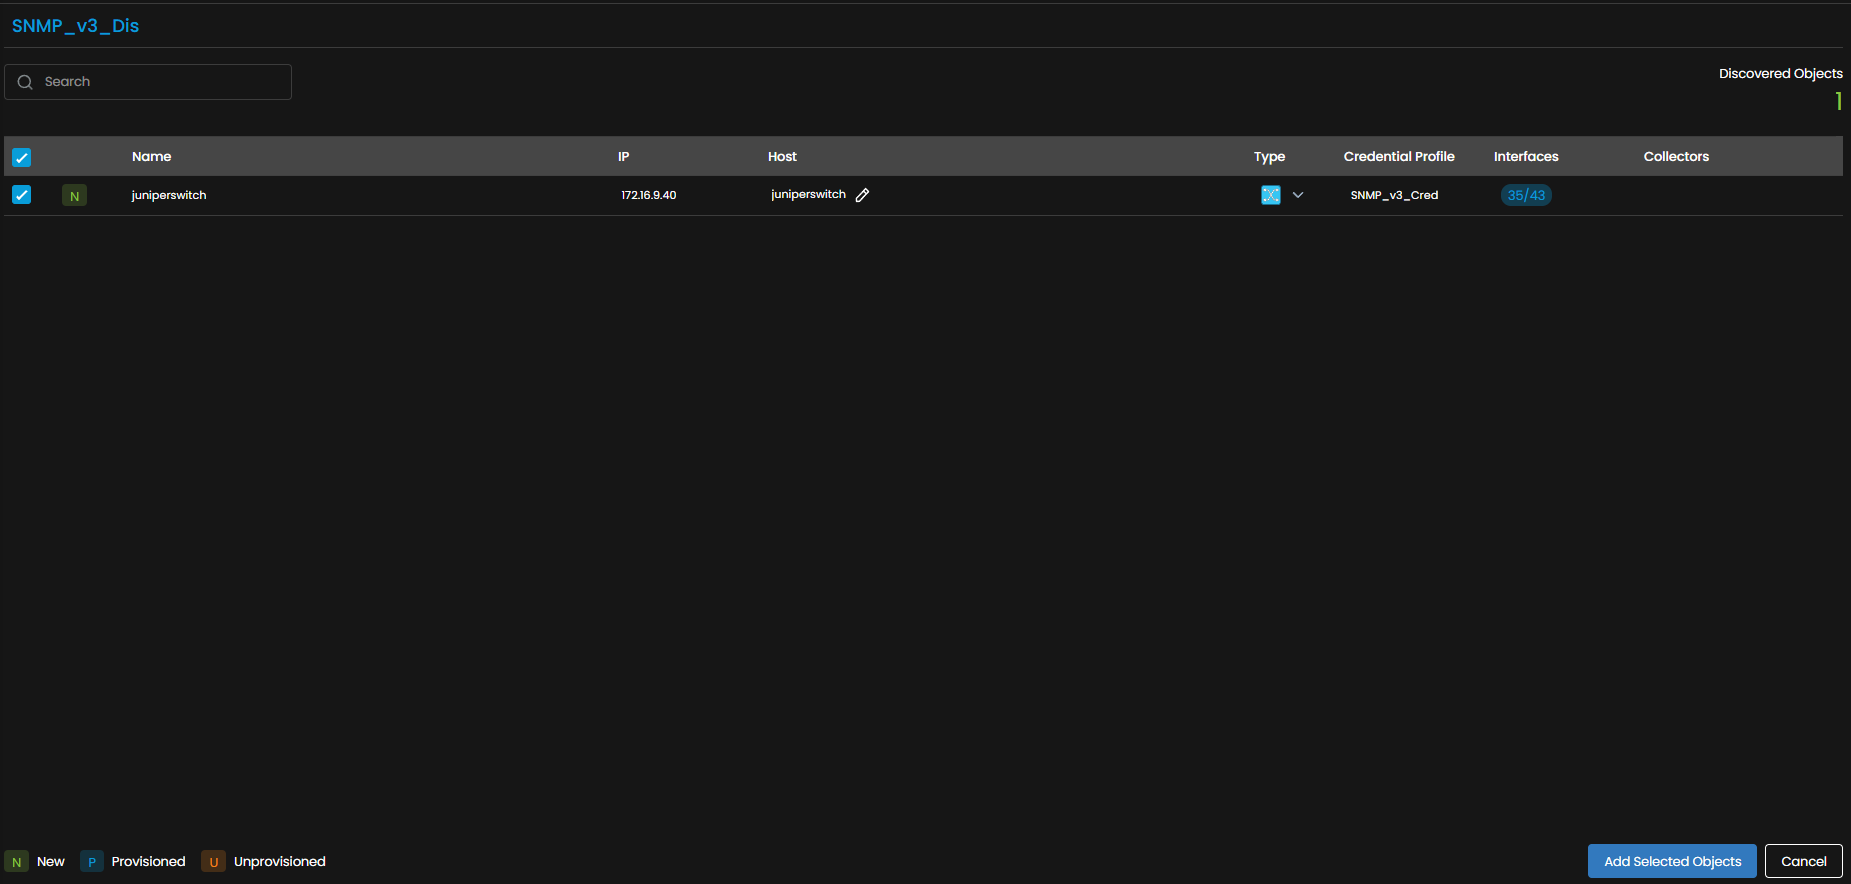
Open the Provisioning screen to see all discovered devices. Select the devices you want to add as Monitors.
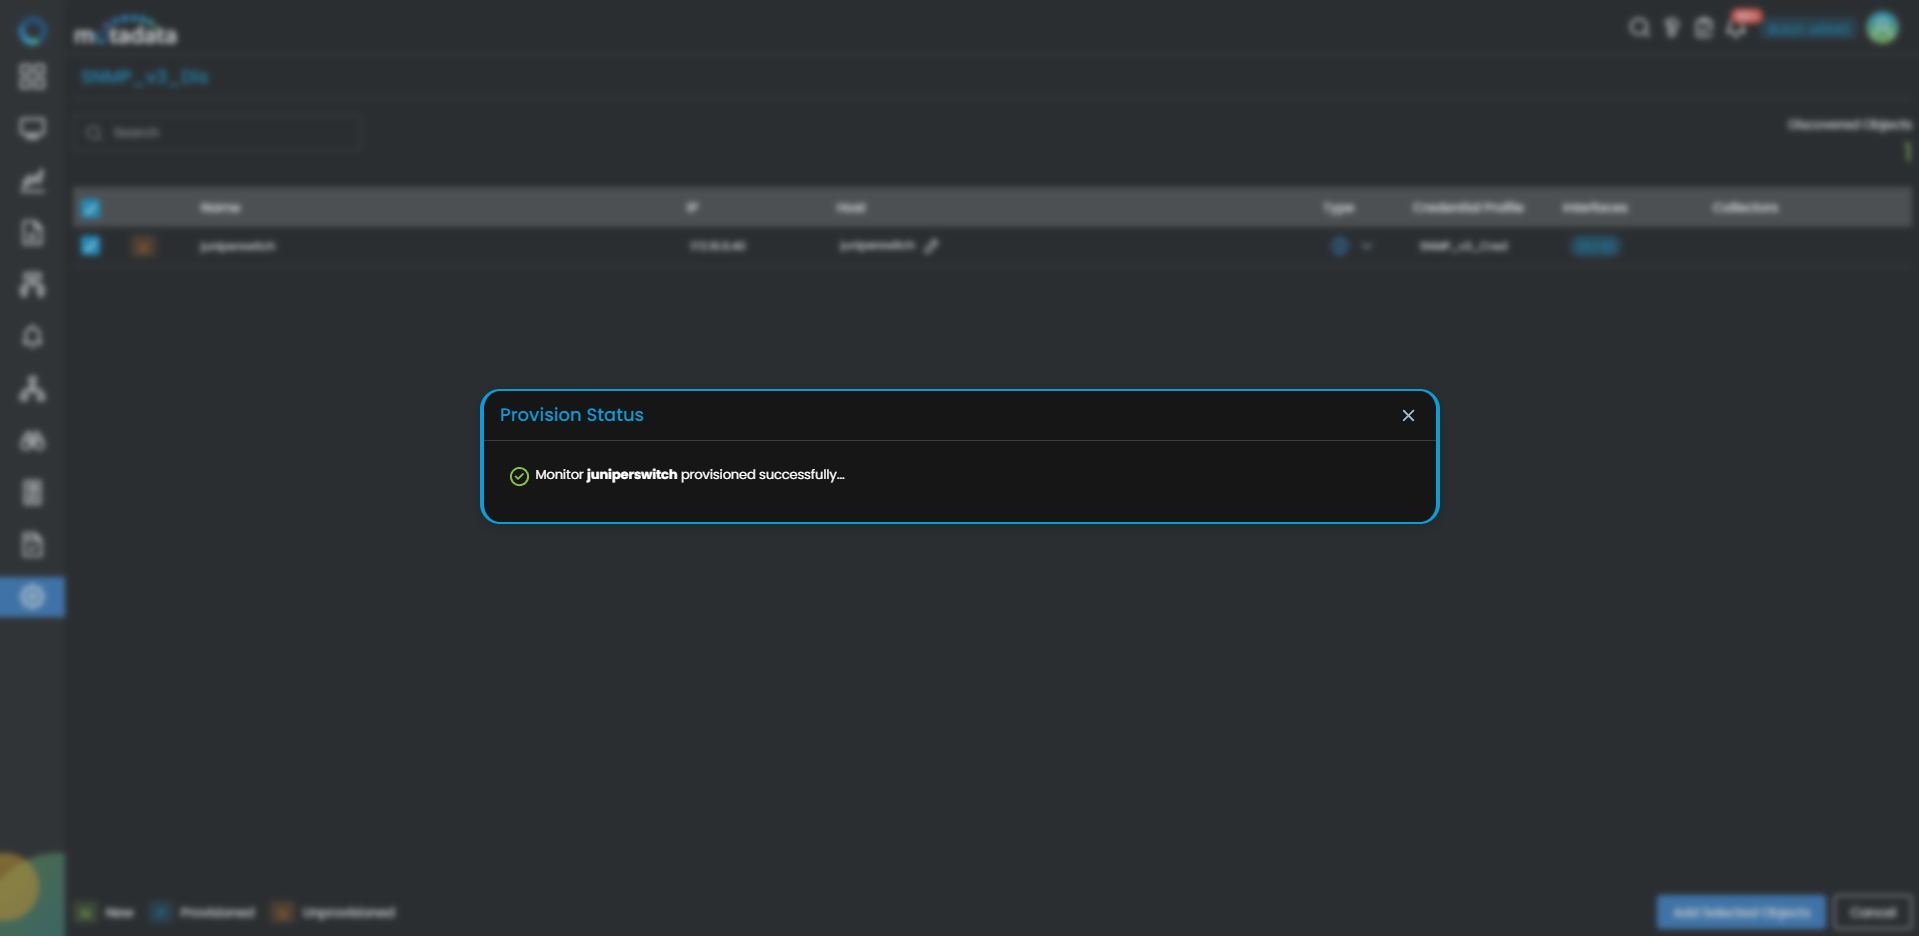
Select Add Selected Objects to provision the selected devices as monitors. ObserveOps now collects metrics from these devices continuously.
To view the monitors, go to Menu. Select Monitor. Select Network.
The SNMP v3 network devices are now added to ObserveOps.
Adding UPS Devices for Monitoring
ObserveOps monitors UPS (Uninterruptible Power Supply) devices via SNMP, giving you visibility into battery charge level, remaining runtime, input and output power metrics, output load percentage, and device status conditions such as on-battery and low-battery states.
Prerequisites
- SNMP must be enabled on the UPS device.
- Confirm that port
161is open and accessible from the ObserveOps server. - The SNMP community string (V1/V2c) or SNMPv3 credentials configured on the UPS.
1. Create a Credential Profile
Go to Menu. Select Settings . Select Discovery Settings . Select Credential Profile. The Credential Profile screen opens. Select Create Credential Profile.
The Create Credential Profile form opens.
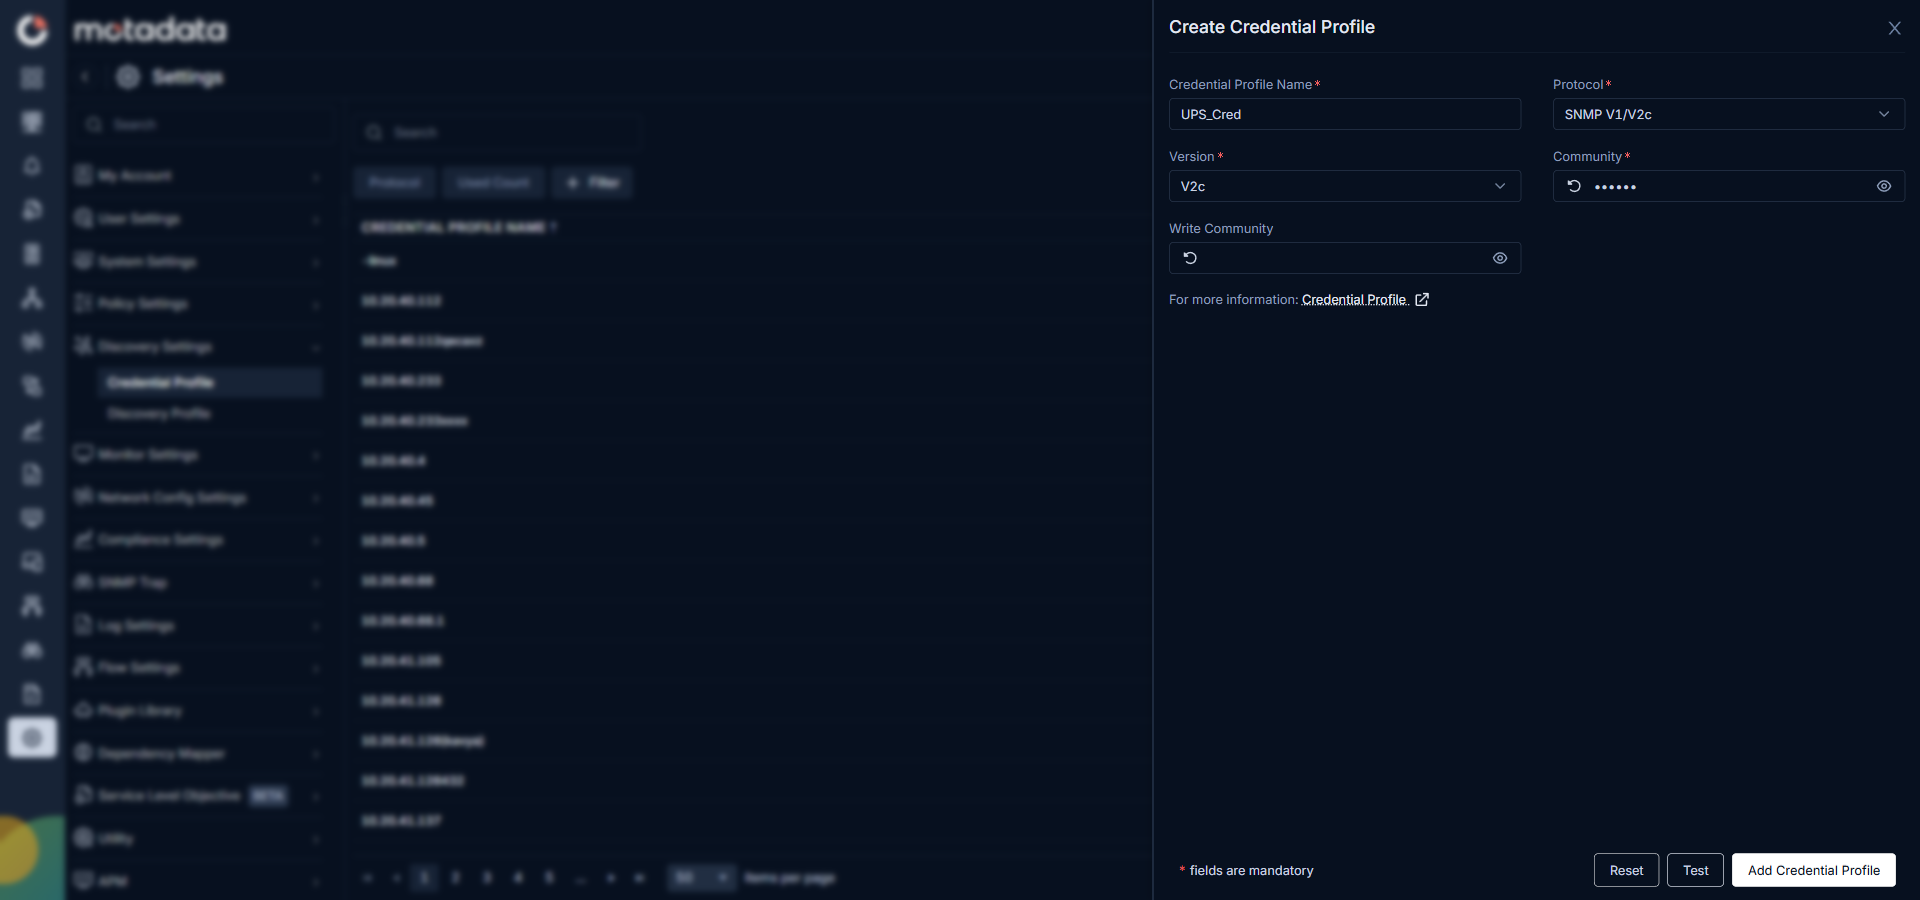
| Field | What to Enter |
|---|---|
| Credential Profile Name | A unique name to identify this profile |
| Protocol | Select SNMP V1/V2c or SNMP V3 based on your UPS configuration |
| Version (V1/V2c) | Select V1 or V2c and enter the Community string |
| Security User Name (V3) | The SNMPv3 username, Security Level, and authentication/privacy settings |
Select Reset to clear all fields. Select Add Credential Profile to save.
2. Create a Discovery Profile
Go to Menu. Select Settings . Select Discovery Settings . Select Discovery Profile. The Discovery Profile screen opens. Select Create Discovery Profile.
The Create Discovery Profile form opens. Select Network from the sidebar.
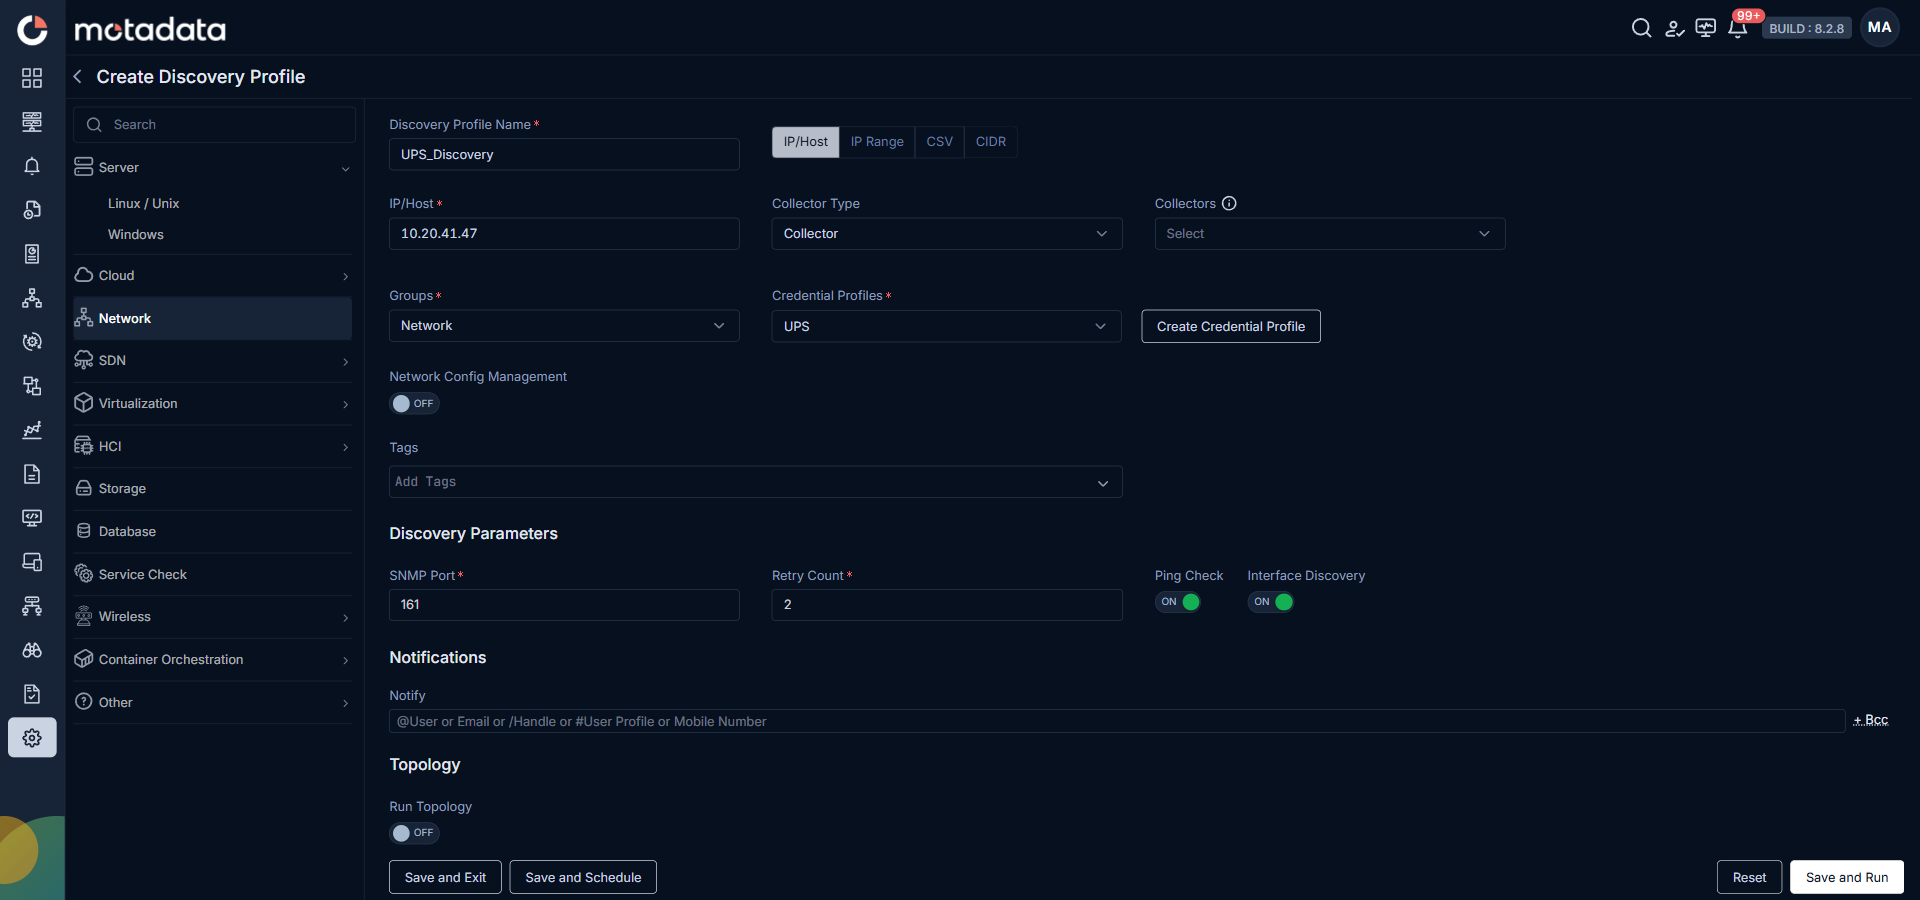
| Field | What to Enter |
|---|---|
| Discovery Profile Name | A unique name to identify this profile |
| IP / Host | The IP address of the UPS management card or device |
| Collectors | One or more Collectors for data collection. If you skip this, ObserveOps selects a Collector automatically. |
| Groups | One or more Groups to assign to provisioned monitors |
| Credential Profile | Select the UPS SNMP credential profile you just created |
| Tags | Tags to assign to discovered devices |
| Port | Defaults to 161. No change needed. |
| Ping Check | On by default. Toggle off if the UPS does not respond to ping. |
| Notify Team | Email addresses, handles, or user profiles to notify when discovery completes |
Select Collectors based on how you want to distribute the monitoring load.
Select Save and Run to save and start discovery immediately. Select Save and Exit to save without running.
3. Provision the Discovered UPS Devices
After the discovery run completes, open the Provisioning screen to see the discovered UPS devices. Select the ones you want to add as Monitors.
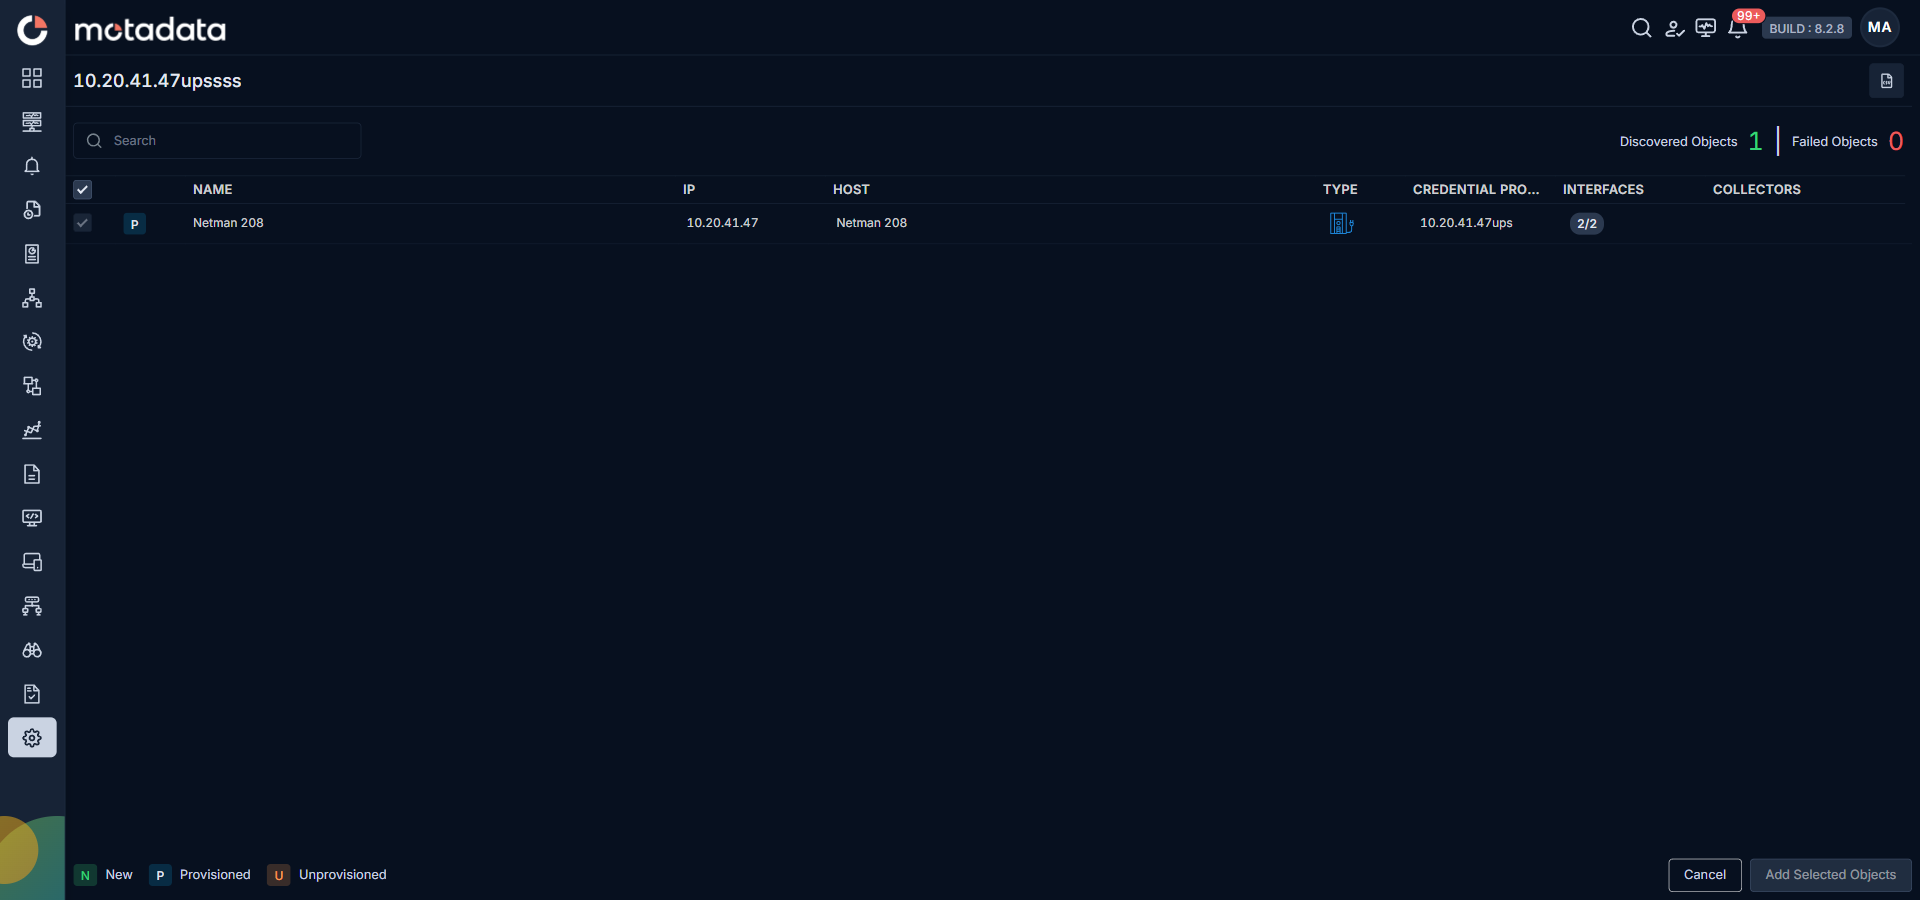
Select Add Selected Objects to provision them. The UPS devices are now added to ObserveOps.
Interface Error Metrics
After ObserveOps provisions a network device as a monitor, it polls a per-interface CRC/FCS error counter over SNMP alongside the standard interface counters. CRC/FCS errors are one of the earliest signs of physical-layer problems such as bad fiber, dirty or loose connectors, failing SFPs, or duplex mismatch. Because the counter isolates these from other error types, you can pinpoint a failing link faster than with an aggregate inbound-error signal alone.
The counter is available out of the box across supported multi-vendor SNMP devices. It appears alongside the existing interface counters on the monitor's metric list and can be plotted, alerted, and reported.